Make Your Own Spanish Guitar - online book
Complete plans & Instruction on how make your own Spanish Guitar.
| Share page | Visit Us On FB |
|
11 |
|||
|
|
|||
 |
THE LININGS
The next step is to prepare the inside linings, which are fitted to the bottom and top edges of the sides. The purposes of these linings is not only to give strength to the sides but to increase the glueing area when it comes to fitting the back and face of the instrument.
The linings are of two kinds.
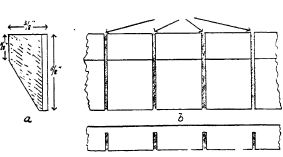
For the top edges of the guitar, i.e. where the face of the instrument is later fitted, a length of spruce or pine, f " by J" (or slightly less) is cut to the shape shown in Fig. 7 (a) and then sawn almost through at about 1/2" intervals (b) so that the length of wood (not less than 30") can follow the contours of the sides. |
||
|
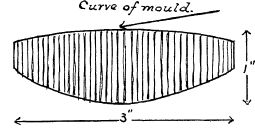
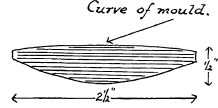
Fig. 5.�Above: The top block. Below: The bottom block. (Note direction of grain of wood.) |
|||
 |
|||
 |
|||
|
These blocks, which are cut from the solid slightly deeper than the height of the guitar sides, are then shaped on one side to con�form to the curve of the mould; one for the top and the other for the bottom. With the guitar sides still held rigidly in position in the mould by the braces (see Fig. 4) the blocks are then glued and cramped into position. (See Fig. 6 on previous page.)
(Although synthetic glue can be used in making a guitar it is advised that best Scotch or fish glue be used throughout�and here it might be mentioned that this takes from five to eight hours to set hard, depending upon its consistency.)
Satt) cuts |
|||
|
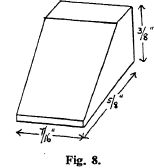
Some craftsmen prefer to make small individual blocks (see Fig. 8) which are glued in all round the upper edge of the sides. It will readily be seen that this method is more laborious (both in pre�paring the small blocks and in fitting them) but it does help to reduce the weight of wood used and, in addition, allows the face to vibrate more freely when the instrument is played.
Whichever method it is decided to use, once the strips of wood or small blocks are prepared, the next process is to glue them in position. The amateur guitar maker will probably find that fairly large spring clothes-pegs is the best means of holding the strip or blocks in position as they are fitted to the sides in the mould.
As the sides of the guitar can be lifted slightly to project above the surface of the mould it will be easy to clamp the clothes- |
|||
 |
|||
|
Fig. 7.�Showing how the length of spruce or pine is shaped and then sawn almost through at inter�vals of about 1/2". (Where the lining fits the inside curves of the sides it may he necessary to cut the slots closer man 1/2" to allow the lining to conform to the guitar shape.) |
|||
|
|
|||